Introduction
Kling AI is a cutting-edge, text-to-video generation platform that transforms your written prompts into high-quality, realistic videos in seconds.
 |
| Kling AI: A Step-by-Step Tutorial |
Whether you’re a marketer crafting social ads, an educator creating visual tutorials, or a content creator spotlighting products, Kling AI’s intuitive interface and powerful Multi-Elements editing tools make video production effortless. In this guide, you’ll learn how to go from zero to a finished video using Kling AI—step by step, with clear instructions and illustrative images for each stage.
Prerequisites
Before diving in, ensure you have:
-
A modern web browser (Chrome, Firefox, or Edge).
-
A Kling AI account (free tier available; paid plans from $10–$92/month) Tom's Guide
-
Basic familiarity with writing descriptive prompts (no coding required).
-
A stable internet connection for uploading media and downloading videos.
Step 1: Create Your Kling AI Account
 |
| Create Your Kling AI Account |
-
Navigate to the Kling AI website.
-
Click Sign Up and enter your email address or use Google/Apple OAuth.
-
Verify your email by clicking the link in the confirmation message.
-
Log in to access your dashboard and free credits.
Step 2: Choose a Text-to-Video Model
Kling AI offers multiple models—Kling 1.0, 1.5, and 2.0—each balancing speed, quality, and credit usage. To select one:
 |
| Choose a Text-to-Video Model |
-
From your dashboard, click Create New Project.
-
Under Text-to-Video, choose your desired model.
-
Note the estimated credit cost per video based on resolution and duration.
Pro tip: Start with Kling 1.5 for a balance of speed and quality, then upgrade to 2.0 for cinematic effects. Pollo AI
Step 3: Craft an Effective Prompt
The heart of your video is the prompt. Follow these guidelines:
-
Be specific: “A close-up of a red sports car driving along a coastal highway at sunset.”
-
Include style cues: “In the style of a 1980s action movie trailer.”
-
Use negative prompts to exclude unwanted elements (e.g., “no text overlay”).
“A sleek red sports car zooms down a coastal road at sunset, camera pans from left to right, cinematic lighting, 24fps.”
Why it matters: Detailed prompts yield more accurate, engaging videos.
Step 4: Configure Video Settings
Fine-tune your output using these options:
 |
| Configure Video Settings |
-
Aspect Ratio: Choose 16:9, 9:16, or 1:1 to suit your platform
- Duration: Set between 5–30 seconds
- Mode: “Standard” for quick renders or “Professional” for higher fidelity
Adjusting these settings optimizes your video for YouTube, TikTok, Instagram, or any other channel.
Step 5: Generate and Monitor Your Video
With prompt and settings in place:
-
Click Generate Video.
-
Watch the progress bar or status indicator—most clips render in under two minutes.
-
If you hit a credit limit or queue, you’ll see a notification; consider upgrading or waiting.
Note: Rendering times vary by model and server load.
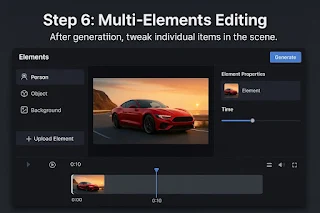
Step 6: Refine with Multi-Elements Editing
Kling AI’s standout Multi-Elements tool lets you tweak individual items in your scene:
-
After generation, click Elements in the sidebar.
-
Upload or select an existing element (person, object, background).
-
Drag it into your timeline and adjust its position, motion path, or duration.
-
Add new text prompts like “Make the car drift at the cliff edge” to re-render just that segment.
This granular control delivers professional-grade results without restarting your whole project. Tom's Guide
Step 7: Preview, Refine, and Download
-
Click Preview to watch the full video end-to-end.
-
If you spot any issues, adjust the prompt or elements and re-generate specific segments.
-
Once satisfied, click Export and choose MP4 or GIF.
-
Save to your device or share directly via social-share buttons.
Conclusion & Next Steps
You’ve now mastered the essentials of Kling AI—from signing up to delivering polished, multi-element videos. Here’s how to level up further:
-
Experiment with Styles: Try vintage, noir, or sci-fi prompts.
-
Batch Generation: Automate multiple clips via Kling AI’s API (see docs below).
-
Collaborate: Invite team members to co-edit projects.
-
Integrate: Embed Kling-generated videos into websites or apps using the Kling AI API.
For in-depth reference, check out the official documentation here: Kling AI Docs and keep pushing the boundaries of AI video creation!


Comments
Post a Comment